Saturday, June 13, 2015

Tiare Smith Designs Temporary Spot!

Hi Loves,

On Monday, June 8, the server that houses Tiare Smith Designs and many other sites was hacked. Some people have malice in their hearts

We are working to recover the data and bring the sites back online.  Tiare Smith Designs may be offline for another 10-15 days, with great hope that it will be completely recovered but a chance that it will not.  Please send good thoughts and energy my way.

In the meantime, I have included links to sign up for the Anniversary Crop and the Embrace your Art Cruise here.  Feel free to sign up.

This is my OLD blog and has some of card making, scrapbooking and weight loss from a few years back.  Feel free to to take a peek.

I will be sure to send a note out with updates on my site and let you know when everything is back online.

Here are some ways that you can stay in touch with me:


I apologize for any inconvenience this may cause.  Thank you so much for your patience and understanding.

Have a super day,
Tiare.

Wednesday, June 5, 2013

EXCITING NEWS!!!! I HAVE MOVED TO http://www.iclassygirl.com

So very excited to share my news!  It's official, as of today, June 5, 2013 I have moved to my new, self hosted site...with my own domain!  Yes!  iClassyirl.com has a new home!  You'll want to bookmark this site. Just copy and paste http://www.iclassygirl.com into your browser. Be sure to update your links and come on over and hang out with me there!

I'm rolling out new products, services, workshops and challenges and it is going to be one crazy, crafty, inspiring summer!

And to mark this momentous occasion for the next 24 hours only,  I am offering my NEW Summertime and the Scrappin' is EASY Challenge/Workshop as a BOGO!  So grab a friend and sign up or just go ahead and sign up and give one to a friend!!!  What a great way to celebrate and craft together. No special codes needed.  Just sign up and I will contact you for information on the 2nd attendee.

Learn more and sign up for this AWESOME challenge here!

Thanks for the many we have shared here on Blogger...now let's continue the fun on the new iClassygirl.com


Tim Holtz Inspired Tag

For the very first time, I checked out  Tim Holtz's 12 Tags of 2013 Challenge and I was totally inspired.  I went right out and bought a set of his distressed markers and a few additional items and got started on my tag.  Here are the results.


Love. Love. Love!

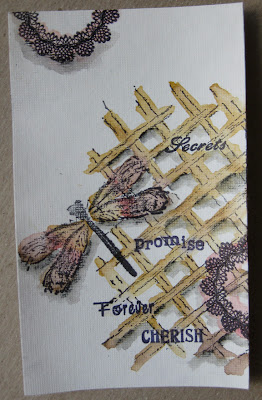
First I stamped, and water colored my images.
Also tore the bottom edge, inked edges, added splats to finish this part of the tag,
as shown above.
  Allow to dry.

I added a bit of paint, smashed the ink pad and added some distress stain.
If you do not have a craft sheet, wax paper will do.
Next, you will also need to spritz with water to blend colors.

Drag piece through paint, stain and ink. Allow to dry
or speed drying time with heat gun.

Drag tag through remaining mix. 

Stamp over colored tag.


Add large grommet and ribbons.
Note.  I spritzed the lace and ribbon to
make it look more distressed and match my tag.
I heated the ribbon to help it dry faster, which also curled the lace.
Love the look. 

FINI!

A closer look. 

Don't forget to come back because there's more!

Comments are welcome and cheered!


Monday, June 3, 2013

Beautiful Mixed Media Bracket Frame: How To...

Ahhhh, the joy of crafting. I've been spending at least an hour in my craft studio each day. It feels so good, so relaxing.  With that time has come an overload of creativity and I am not complaining.  I LOVE it.

I recently took part in a Pay it Forward Swap on SOC, where you were given two names and you had to create something for each person and send it to them by May 31.  Here is the frame I created for one of my pals and how you can create one too!


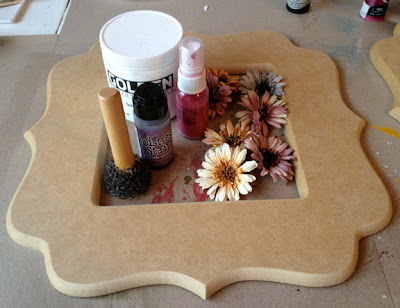
Gather supplies: Gesso, Tim Holtz Distress Stains, Diva Mists, Prima Flowers,
paint brush, sponge for texture and of course, your frame. 


Cover frame with Gesso.  Allow to dry. 

Dip sponge in Gesso and sponge onto frame to add texture.
Allow drying time.

I used distress stain to color a few of the flowers. 

Or use mists to change and enhance color of flowers.
Set flowers aside to dry. 

Next, I misted the frame.  Allow to dry or use your heat gun to
speed up drying time.  Next, I stamped the frame in several places, using a background
lattice stamp.

Add bling!  I also dipped my sponge in the Gesso again to add
a bit more texture in white atop the painted frame. 
Add flowers and butterfly.  I used a strong wet adhesive along
with some glue dots for added hold. 

I added a bit of Stickles to add more sparkle.
See the squiggly line.  Just squeeze and draw!


Allow frame to dry completely overnight. 


Beautiful!

I truly enjoyed the process of creating this frame and I find that I enjoy painting, stamping and inking quite a bit.

That's just one of my recent projects.  Stay tuned for another frame later this week, a pretty junque journal page, an awesome Tim Holtz inspired tag and more!

You don't want to miss a beat.  I'll be sharing how to's, tips and so much more!  If you are looking for incredible endless inspiration.  You've come to the right place!


Saturday, June 1, 2013

Incredible Endless Inspiration!


So excited, as I gear up for an AMAZING remainder to 2013!  My mojo is in full swing and I've got tons of INSPIRATION to share with you over the coming months.

Be sure to look for:
  • Got 5 Minutes?  Then you've got a FINISHED page and I'll show you how. From DESK to DONE!  Coming June/July 2013.  Sign up for updates.
  • Partnership Opportunities with Classygirl.  Earn extra $.  New Affiliate Program coming soon. Earn commissions.  NO FEES!   Be the first to know.  Join the iClassygirl.com Affiliate mail list today. 
  • Monthly Online Scrapbook Pajama Party!  LIVE Streaming! Scrappy Inspiration with your Scrappy Pals.  Don't miss out, get your reminder here!
  • From Paper Crafts to CASH!  Learn how to build and grow your own paper crafting business and turn your PASSION into PROFIT. Book release coming soon/June 2013.  Get your notice HERE!

Stay tuned for:
  • UNIQUE scrapbook pages.
  • FRESH and FUNKY card ideas.
  • AWESOME mixed media projects.
  • ARTSY art journaling pages.
  • INSPIRING junque journal pages.
  • NEW "How to" videos.
  • AMAZING online classes. 
  • STEP by STEP tutorials.
  • EASY to follow crafty tips and ideas.
  • MORE creativity.
  • MORE happiness.
  • MORE FUN!

I hope you are ready to be inspired!  It's going to be a GREAT summer and a FANTASTIC rest of the year!  You don't want to miss a moment of it.  Sign up for updates and get your free book today!  Top right side-bar. 

Ahhhh...and that was just a little sneak peek of a FABULOUS project, I'll be sharing next week!

You asked for more...you got MORE!


Friday, May 31, 2013

Mist for a More Saturated Color


I enjoy trying different things to change up my typical scrapbooking style.  It can be anything from using different types of embellishments to trying a new technique or changing up my typical photo layout.


Here I decided to "change it up" by using beads and by misting my flower to more closely match the deep browns in the patterned paper and cardstock. If you look closely, it actually created several shades of brown and more defined creases on the petals.  I love the look. I then added a bead in the center of the button, atop the flower for an added unique touch.

Layout of me doing what I love to do, crafting!

Supplies used: Bazzill Cardstock, Basic Grey Patterned Papers, Thickers by American Crafts for title lettering, Paper Studio beads and pearls. Rub ons. 

Live creatively,


Thursday, May 30, 2013

Creative Ideas for Your Layouts and Cards: Scrapbook PJ Party Recap


We had a great time last night at the Scrapbook Pajama Party and yes, I was on camera in my jammies!

I want to thank everyone that came out last night and for being patient when the service went out and for finding the new video feed.  You all ROCK.  I'll be sending a note to Spreecast to be sure that we can quickly fix the problem should this ever happen again.

Here I share the fast and fabulous layout we created last night and the card.  With great patterned papers and few embellishments you can still have great results!


Supplies used: Kraft cardstock, Adorn It Vintage Groove Collection Patterned Papers, Making Memories Velvet Alphas, Want 2 Scrap Pearls.

Ideas to note:  

Questions and comments are cheered!!!

Live creatively,


LinkWithin

Related Posts Plugin for WordPress, Blogger...