For the very first time, I checked out Tim Holtz's 12 Tags of 2013 Challenge and I was totally inspired. I went right out and bought a set of his distressed markers and a few additional items and got started on my tag. Here are the results.
Love. Love. Love!
First I stamped, and water colored my images. Also tore the bottom edge, inked edges, added splats to finish this part of the tag, as shown above.Allow to dry.
I added a bit of paint, smashed the ink pad and added some distress stain. If you do not have a craft sheet, wax paper will do. Next, you will also need to spritz with water to blend colors.
Drag piece through paint, stain and ink. Allow to dry or speed drying time with heat gun.
Drag tag through remaining mix.
Stamp over colored tag.
Add large grommet and ribbons. Note. I spritzed the lace and ribbon to make it look more distressed and match my tag. I heated the ribbon to help it dry faster, which also curled the lace. Love the look.
Ahhhh, the joy of crafting. I've been spending at least an hour in my craft studio each day. It feels so good, so relaxing. With that time has come an overload of creativity and I am not complaining. I LOVE it.
I recently took part in a Pay it Forward Swap on SOC, where you were given two names and you had to create something for each person and send it to them by May 31. Here is the frame I created for one of my pals and how you can create one too!
Gather supplies: Gesso, Tim Holtz Distress Stains, Diva Mists, Prima Flowers, paint brush, sponge for texture and of course, your frame.
Cover frame with Gesso. Allow to dry.
Dip sponge in Gesso and sponge onto frame to add texture. Allow drying time.
I used distress stain to color a few of the flowers.
Or use mists to change and enhance color of flowers. Set flowers aside to dry.
Next, I misted the frame. Allow to dry or use your heat gun to speed up drying time. Next, I stamped the frame in several places, using a background lattice stamp.
Add bling! I also dipped my sponge in the Gesso again to add a bit more texture in white atop the painted frame.
Add flowers and butterfly. I used a strong wet adhesive along with some glue dots for added hold.
I added a bit of Stickles to add more sparkle. See the squiggly line. Just squeeze and draw!
Allow frame to dry completely overnight.
Beautiful!
I truly enjoyed the process of creating this frame and I find that I enjoy painting, stamping and inking quite a bit.
That's just one of my recent projects. Stay tuned for another frame later this week, a pretty junque journal page, an awesome Tim Holtz inspired tag and more!
Each month on SOC we are being challenged to alter a different item. For the month of February the challenge was to alter a toilet paper roll. Yep, you read correctly...a toilet paper roll.
Here is my creation. It's a simple ornament/flower which can actually be used now, as part of a bit of "Spring Happiness." I chose blue because I love this shade and I have 2 more shades each one lighter than the last and thought it would be cute to make one in each color to hang in my craft room.
This ornament/flower was very simple to make. Here are the steps:
Supplies:
1 Toilet Paper Roll
Glitter
Wet glue that dries fairly quickly.
Colored floss
Paper Piercer
Instructions:
Flatten toilet paper roll
Mark at about ever 1/2 inch or a little less
Cut at each 1/2 mark spot, to create the petals.
Adhere together 1 petal at a time with the wet glue. Be sure to hold together each set of petals to make sure they adhere to one another.
Poke hole through top petal, using paper piercer. Thread floss through hole and tie a knot. Be sure to leave a loop on top of the petal for ease of hanging.
Next apply glue to the edges/outer layer of a petal or two.
Pour glitter over petal (I poured over a tray with a spout so I could easily pour the glitter back into the container).
Repeat steps 6 and 7 until all petals are covered.
Ideas to note: I love the little bubbles of glitter created by clumps of glue. Also, try painting the petals or covering with patterned paper and/or adding bling for a unique look.
This week over on SOC for the Sistah/Brotha Blogger Challenge we were challenged to create/alter a frame and now that my scrap room is clean, I felt like getting in there and getting a little crafty! Therefore, I played along. I kept it small, which made it easy for me to complete.
This is a small magnetic frame. I got if probably 3 years ago. The frame is by Bazzill Basics and covered in their beautiful cardstock. To jazz it up, I misted the frame with Glimmer Mist Aged Brick. You can't see it in the photo but it's nice and sparkly! I also misted the letter "C," from Pressed Petals. I added patterned paper from Basic Grey and a variety of elements from The Paper Studio, Prima(flower) and Making Memories.
I like the way it turned out. Now will I keep it or give it away? Hmmmm? I know a few people who's name begins with C!
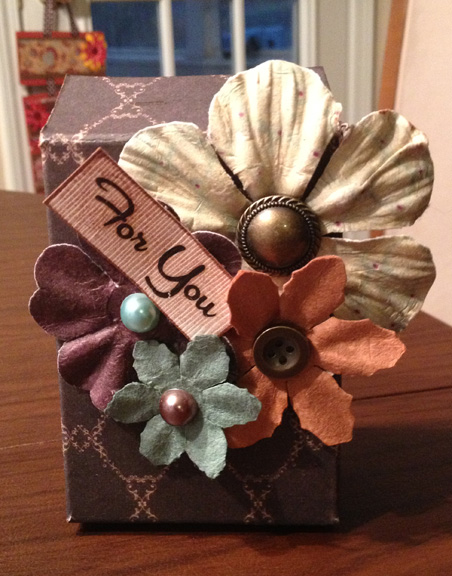
This past weekend I created this cute altered box. I am participating in a year long altered art challenge. Each month we are challenged to create a different altered item. This month the challenge is to alter a soap box...you know the little box a bar of soap comes in.
I love how it turned out and think this would be a great idea for the holidays. This year at Christmas time I may alter some boxes, using Christmas paper and add some trail mix or other sweet treat, as cute little gifts for my neighbors and a few friends.
Here are a few tips for creating your own altered soap box:
Be sure to open the box fully on all sides.
Ink the edges to prevent the "white" for showing on the edges (I actually forgot this step...to busy running my mouth with crafting with friends. LOL!)
Adhere the box outside down on the paper you are going to alter it with, being sure you are adhering it to the back of the paper so the pattern shows on the outside of the box.
Glue the box back together...leave the top open...add goodies
Or leave the top open but fold down into the box and add pens, flowers or other tall items.
I have decided to participate in the Bloggers' Challenge on SOC. Each week there will be a challenge issued to create, journal, share and post to your blog. The challenge starts now and goes through 2013. I think this might be a great way for me to step out of my sweet little box and also gives me a bit of freedom. Freedom from always being the person to organize things, think of what needs to be done. I can simply follow along, share and have fun. So be sure to stop by often and see what's going on.
Of course along the way, I'll also post and share my own posts and creations. So be sure to stop by often.
For the 1st week...which was really last week, we were asked to share our favorite Christmas song and a creation that represents it. Hmmmm?
I have two songs that I consider my favorites. One is from my childhood, "I'm Gettin' Nuttin' for Christmas." Does anyone know this song? I wore this album out, when I was a kid! I'm still searching for the old Frosty the Snowman album/version. The ending here is not the same I grew up with but this is a funny video.
The other song is "This Christmas" by Donny Hathaway. Oh.....so love this song and look forward to hearing it on the radio...played randomly. However, this year they are playing the sad remakes. Uuuuuggggghhhhh! Nothing like Donny Hathaway...all imitators take a seat!
And now for my creation. I really didn't know what to create to go with the songs. However, I tried something new. Therefore, I figured...it would make, "This Christmas" a very special Christmas for me. I saw this cute little idea in one of my healthy living magazines. So I gave it a try. Well, it turned out ok. I will probably make another being sure to use my trimmer to cut the strips the right length and with (I tore the strips...LOL!)to make it a bit more even and I also need heavier wire so that I can actually make a circle! LOL!
Anyway, the supplies I used were one large, brown paper bag, along with wire, ribbon, scissors, a paper piercer, a ruler and a marker.
You want to give it a try. Here are the instructions:
Cut approximately ten 3/4 inch by 11 inch long strips of paper bag.
Crumple the strips to soften
Poke a hole 1/2 inch from top center of each strip with paper piercer.
Poke additional holes every inch down the center of each strip.
Thread strips with wire, folding back and forth on wire.
Twist ends of wire together to secure
Shape the wire to form a circle
Twist ruffles randomly around wreath
Tie bow onto wire and clip ends of ribbon or notch.