Showing posts with label mixed media. Show all posts

Wednesday, June 5, 2013

Tim Holtz Inspired Tag

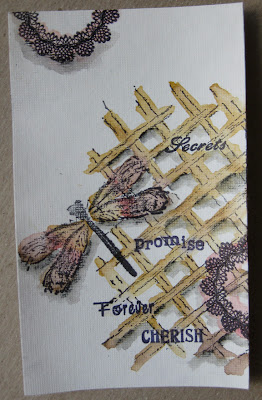
For the very first time, I checked out  Tim Holtz's 12 Tags of 2013 Challenge and I was totally inspired.  I went right out and bought a set of his distressed markers and a few additional items and got started on my tag.  Here are the results.


Love. Love. Love!

First I stamped, and water colored my images.
Also tore the bottom edge, inked edges, added splats to finish this part of the tag,
as shown above.
  Allow to dry.

I added a bit of paint, smashed the ink pad and added some distress stain.
If you do not have a craft sheet, wax paper will do.
Next, you will also need to spritz with water to blend colors.

Drag piece through paint, stain and ink. Allow to dry
or speed drying time with heat gun.

Drag tag through remaining mix. 

Stamp over colored tag.


Add large grommet and ribbons.
Note.  I spritzed the lace and ribbon to
make it look more distressed and match my tag.
I heated the ribbon to help it dry faster, which also curled the lace.
Love the look. 

FINI!

A closer look. 

Don't forget to come back because there's more!

Comments are welcome and cheered!


Monday, June 3, 2013

Beautiful Mixed Media Bracket Frame: How To...

Ahhhh, the joy of crafting. I've been spending at least an hour in my craft studio each day. It feels so good, so relaxing.  With that time has come an overload of creativity and I am not complaining.  I LOVE it.

I recently took part in a Pay it Forward Swap on SOC, where you were given two names and you had to create something for each person and send it to them by May 31.  Here is the frame I created for one of my pals and how you can create one too!


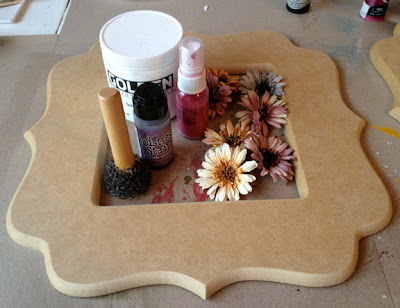
Gather supplies: Gesso, Tim Holtz Distress Stains, Diva Mists, Prima Flowers,
paint brush, sponge for texture and of course, your frame. 


Cover frame with Gesso.  Allow to dry. 

Dip sponge in Gesso and sponge onto frame to add texture.
Allow drying time.

I used distress stain to color a few of the flowers. 

Or use mists to change and enhance color of flowers.
Set flowers aside to dry. 

Next, I misted the frame.  Allow to dry or use your heat gun to
speed up drying time.  Next, I stamped the frame in several places, using a background
lattice stamp.

Add bling!  I also dipped my sponge in the Gesso again to add
a bit more texture in white atop the painted frame. 
Add flowers and butterfly.  I used a strong wet adhesive along
with some glue dots for added hold. 

I added a bit of Stickles to add more sparkle.
See the squiggly line.  Just squeeze and draw!


Allow frame to dry completely overnight. 


Beautiful!

I truly enjoyed the process of creating this frame and I find that I enjoy painting, stamping and inking quite a bit.

That's just one of my recent projects.  Stay tuned for another frame later this week, a pretty junque journal page, an awesome Tim Holtz inspired tag and more!

You don't want to miss a beat.  I'll be sharing how to's, tips and so much more!  If you are looking for incredible endless inspiration.  You've come to the right place!


Monday, May 20, 2013

Paint, splatter, spritz!


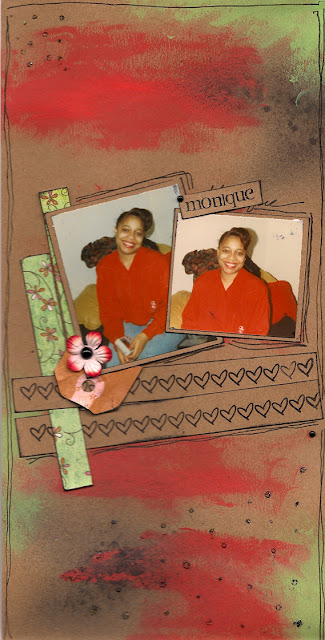
Continuing to play with paint, mists and stickles.  I painted the backgound in with a bit or red and green acrylic paint.  Added a spritz of mist and then a few dots with the stickles.  To finish my touch of mixed media, I stamped the heart lines.  Cute.

Supplies used: Kraft card stock, Glimmer Mist, Verve Stamps, Stickles, Making Memories Acrylic Paints

Happy Monday.  I hope you find time to craft!


Monday, May 13, 2013

Art Journaling/Mixed Media: List of Supplies for Beginners


If you follow my blog or me on Facebook you know that I have fallen in love with art journaling, junque journaling and mixed media.  I just cannot get enough.  I've been in my craft studio every day playing with Gesso, paints, dyes, mists and inks.  What fun.

I've been creating layouts without patterned paper (gasp) and LOVING it.  For those who know me, this is a FAR departure from my "normal" style of scrapbooking, where patterned papers rule with each layout needing to contain 3 or more patterns.  However, I find it freeing, fun and very artsy. 

I am quickly adding to my collection of paints, stamps, mists and such...as seen by the above picture. The stash grows!

However, I thought it would be nice to share a simple list of supplies you might want to purchase or gather if you too would like to give mixed media and art journaling a shot without breaking the bank.  Many of you already may have some of this stuff in your stash.  However, there are a few essentials I think are necessary, just so you can give it a try.  Once you find your rhythm you can add to the supplies.  You might find you like art journaling or not so much.  One thing to remember...do what you want.  The coolest part of art journaling is, there are NO rules.  Do what you like!


Beginner's supply list:
  • Gesso (to prime your paper. You want to use this. It will allow your paints/supplies to go much further.
  • Acrylic Paints
  • Ink pad
  • Stamps 
  • Templates
  • Brushes
  • Mists
  • Sharpie or Copic for writing on top of paint
  • Oil Pastels (really not must have for beginners but it'll provide you with a bit of variety. 
  • Paint tray 
  • Artists Sketch Book with heavy paper to hold up to the painting and misting. 

Here is my first layout created without patterned paper.  I LOVE how this turned out.  I used a stamped image, paint, stickles, rub ons, flowers and buttons to complete this layout.  It's in 6x12 format for a special album I'm creating of friends from days gone by!


Stayed tuned more creations coming soon, including some art journaling and junque journaling pages!

Happy Crafty Monday!

LinkWithin

Related Posts Plugin for WordPress, Blogger...